Monday, March 7, 2011

Roast Pork Shoulder

I was so confused on what to make for this week’s lunch. I knew I wanted to cook the Minestrone soup for dinner because of the cold weather but bringing the soup to the office is somewhat out of the question because of potential spillage issue. After browsing online, I decided to make Roast Pork Shoulder – which can be used for lunch with some kind of side vegetables and carbs or for the toppings on our dinner salad – using a recipe from this blog My husband cooks.

It seems that the trick of making a good roast of a big piece of meat are 1) marinate at least overnight and 2) cook it slow and steady in a low oven temperature. I knew about the importance of marinating but stupid me I didn’t read the whole cooking instructions on the site until Sunday afternoon when I found out that it needed to be cooked for 9-10 hours at 250F. After scrambling around to do some more online research while preheating the oven, I found out from Simply Recipes that I can cook it in a much shorter time and still get the caramelization that I want by first cook it uncovered in a 450F oven for 30 minutes and then cook it covered in a 325F oven for 3 hours. Phew! The roast pork shoulder turned out to be super tasty and moist – thanks to all those pork fat!


Ingredients:
4 lbs pork shoulder (boneless)
1/2 cup dark brown sugar
1/2 cup salt
2 tablespoons paprika
2 tablespoons cumin
1 tablespoon red pepper flakes
1 teaspoon cayenne
1/2 teaspoon turmeric
1 cup of dry white wine

Directions:
  • In a small bowl mix together the brown sugar, salt, paprika, cumin, red pepper flakes, cayenne, and turmeric.
  • Pat dry the pork shoulder with paper towels and rub the seasoning mixture evenly over the pork shoulder inside and out.
  • Wrap the pork shoulder tightly in plastic wrap to hold the marinade against the skin, put it in a large bowl and marinate overnight. It will give up a cup or more of liquid so make sure your container is big enough to prevent spillage.
  • 1 hour before cooking, take out the pork shoulder from the refrigerator.
  • Preheat the oven to 450°.
  • Place the pork shoulder on aluminum foil wrapper roasting pan (so it’s easier to clean) and roast uncovered for 30 minutes.
  • Turn the oven heat down to 325° and add the wine and cover the roasting pan with another sheet of aluminum foil and slow roast for 3 hours until the pork shoulder is very tender and pulls apart easily when probed with a fork. If you want, you can add some more white water every hour or so to baste the pork shoulder.
  • Transfer the pork shoulder to a serving plate and drizzle the pan juice over the meat.

Sunday, March 6, 2011

Meyer Lemon and Blood Orange Marmalade

Since the Alameda antique fair was canceled because of the rain, I found myself with plenty of time to kill today. We went to grab coffee at Contraband, had brunch at a mom-and-pop diner nearby, cleaned up the aquarium and the house, finished off tax documents, cooked Roast Pork Shoulder (which is still cooking in the oven as I'm blogging) and it's not even dinner time yet. So I decided to catch up with my blog and post this Meyer Lemon and Blood Orange Marmalade that I made about a month ago.

I have never made jams or marmalade before but after having my neighbor's tasty apricot jam, I was compelled to try making it and found that this NYTimes marmalade recipe is easy enough for me to follow. It turned out pretty good although next time I would not use the white part of the orange as it makes the marmalade a bit bitter.


Ingredients:
3 medium Meyer lemons, ends trimmed
1 medium blood orange, ends trimmed
1 1/4 cups granulated sugar
1 1/4 cups Demerara (raw) sugar

Directions:
  • Place several small plates or saucers in the freezer.
  • Wash the citrus well under warm running water. Cut the lemons and orange in half lengthwise. Cut each half into 1/8-inch segments, lengthwise. Pluck out any exposed membrane and remove the seeds.
  • Measure the cut citrus. You should have 2 1/2 cups, but if you have less, use the same volume of water and sugar as you have citrus. (If there are only 2 cups, for example, use 2 cups water and 2 cups sugar.) Place the citrus and the same volume of water into a large, heavy-bottomed pot. Bring to a boil over medium-high heat. Cook until the peels are very soft and fully cooked, about 20 to 30 minutes.
  • Add the sugar to the pot, stir to combine. Turn the heat up to high and bring back to a boil. Lower the heat to medium and let the marmalade simmer until set. It should take about 20 to 30 minutes, but start checking after 15 minutes to see if it is set by spooning a little onto a chilled plate from the freezer. If it looks like jam and not runny syrup, it’s ready. (If you want to use a candy thermometer, you are looking for 222 degrees.)
  • Allow marmalade to cool to room temperature before serving. Store leftovers in the refrigerator and use within a month.

Minestrone (kind of) Soup

Today I made this soup based on a simplified Minestrone recipe on NYTimes in preparation for the cold and wet weather coming to San Francisco. To make it even healthier and substantial, I added some sliced sausages and a can of white kidney (cannellini) bean. I am not really sure if I can still call it Minestrone soup or not but I know that now I am ready to take on the rain!


Ingredients:
4 Italian sausages, sliced
1 onion, chopped
2 carrots, chopped
2 celery ribs, chopped
4 garlic, finely chopped
2 potatoes, cut to 1-inch sections
1 can diced tomatoes, drained & rinsed
1 can white kidney (cannellini) beans, drained & rinsed
1 cup of dry white wine
2 cup of vegetable (or chicken) broth
2 cup of water
1/2 cup of chopped parsley
1 cup of frozen peas
salt & pepper

Directions:
  • Heat up 1 tablespoon of olive oil in a Dutch oven over a medium heat for a couple of minutes and saute the sliced sausages for a few minutes until totally cooked and set aside.
  • Add a couple more tablespoons of olive oil into the pan and saute the chopped onion, carrot, celery rib and minced garlic for 5 minutes.
  • Add the cubes potatoes and cooked for 2 minutes.
  • Add the drained tomatoes, white wine, broth, and water.
  • Cook until boil and lower the heat to a simmer for 10 minutes.
  • Add the drained beans and simmer for another 15 minutes.
  • Add in the chopped parsley and frozen peas.

Sunday, February 27, 2011

Stir-fried Yu Choi and Shiitake Mushroom

Here is a simple and delicious vegetable dish that can be used as a main dish or a side dish for something like Osso Buco since it can stand up for itself. It took me only 5 minutes to prep and another 5 minutes to cook the dish.


Ingredients:
1 lb yu choi or other chinese vegetables, ends trimmed
1/2 lb shiitake mushroom, sliced
6 cloves garlic, roughly chopped
1-inch ginger, julienned
2 tablespoons olive oil

Sauce:
1 1/2 tablespoons soy sauce
1 1/2 wine
1 teaspoon sugar
1/2 teaspoon salt
1 teaspoon sesame oil

Directions:
  • Combine all the sauce ingredients in a small bowl and set aside.
  • Heat the oil in a wok on a medium high heat and, when hot, add the garlic and ginger and stir-fry quickly for 1 minute or so until fragrant.
  • Add in the vegetables, mushroom, and sauce and stir until combined. Cover and cook for 2-3 more minutes.

Osso Buco

It's going to snow in San Francisco... it's going to snow in San Francisco... NOT! After a non-stop hoopla in the news in the past week, snow did not arrive in San Francisco this weekend. Although it was cold, it was sunny all weekend long and it reminded me of the days when Arthur just laid out on the balcony or in front of the window enjoying the sun. My beautiful dog Arthur passed away 2 weeks ago because of lymphoma cancer, he came to my life, turned it up side down for good and I missed him dearly.

I made this Simply Recipes' Osso Buco in expectation that it would be an overcast wet and cold weekend and in memory of Arthur because I know that he would enjoy gnawing the bone marrow out of the shanks. I couldn't find any veal shanks so I used beef shanks instead which means I had to cook it for another hour to get it tender. I served this delicious goodness on top of steamed white rice, sprinkle with gremolata and a side of Stir-fried Yu Choi and Shiitake Mushroom.


Ingredients:
1/4 pound pancetta, diced 1/4 inch cubes (do not substitute bacon)
2-1/2 to 3 pounds veal shanks (4 to 6 pieces 2-3 inches thick)
1/2 cup diced carrot (1/4 inch cubes)
1/2 cup diced celery (1/4 inch cubes)
1 medium onion, diced 1/4 inch pieces
2 tablespoons (about 4 cloves) chopped garlic
3-4 sprigs fresh thyme (or 1 teaspoon dried)
1 cup dry white wine
1-2 cups chicken or veal stock
flour for dusting the meat before browning
salt and pepper

Gremolata:
2 tablespoons minced flat (Italian) parsley
1 tablespoon grated lemon zest
2 cloves garlic, crushed and minced

Directions:
  • Preheat oven to 325°F.
  • Heat a dutch oven on the stove top over medium heat for about five minutes. Add pancetta to pan, cook, stirring occasionally. When the pancetta is crispy and most of the fat has rendered (about 5 minutes of cooking), remove the pancetta to a plate covered with some paper towel and set aside. If necessary, drain off all but two tablespoons of the fat from the pan.
  • Season the veal shank well with salt and pepper. Dredge the veal shanks through some flour, shake off any excess, and add the meat to the hot fat in the pan. Increase the heat to medium high and cook the meat on each side until well browned (about 5 minutes per side). Remove the shanks to a plate, set aside.
  • Add the onions, carrots, and celery to the dutch oven. Cook the onion mixture, stirring frequently, until the onions are translucent (about five minutes) and toss in the garlic and thyme. Continue cooking until the vegetables just begin to brown (about 10 minutes).
  • Add the shanks and the pancetta back to the pan. Pour in the wine, and then add enough stock to come a little more than half way up the side of the shanks. Bring to a simmer. Cover the pan and put it in the oven to cook until the meat is tender, about 2-2.5 hours.
  • Combine the gremolata ingredients, place in a separate small serving dish.

Monday, February 21, 2011

Thomas Keller's Gruyère Gougères

I first heard of gougères from Ruth Reichl's book Garlic and Sapphires. The way she described these little cheesy wonders that are so simple, elegant, and so frequently made in the household of a former NYT food critic really makes you salivate. Since then, I have made gruyère gougères several times. The most recent time I opted to use a Thomas Keller recipe. As usual, any recipe touched by Thomas Keller is instantly 50% more complicated than any other recipes. But hey, what other Thomas Keller dishes can be done under an hour (even by a slow cook like me)?

So next time you have friends over and need an appetizer or snack to munch on, make gougères. And make sure they are hot out of the oven when you serve them. That's when they are the puffiest, butteriest, and tastiest.

Note: The recipe calls for 1 tablespoon of salt and the gougères ended up way too salty for me. Since the cheese already has a salty flavor, I'd adjust the salt amount by half next time. Also, add some cayenne pepper! It will make the flavors richer and more intense.


Ingredients:
1 cup water
7 tablespoons unsalted butter
1 tablespoon kosher salt (I suggest using much less)
1 pinch of sugar
1 1/4 cups all-purpose flour4 large eggs (up to 5 eggs)
1 1/4 cups grated Gruyère
Freshly ground white pepper
1 pinch of cayenne pepper (optional)

Directions:
  • Preheat the oven to 450 degrees F. Line two baking sheets with Silpats or parchment paper.
  • In a medium saucepan, combine the water, butter, salt and sugar and bring to a boil. Add all the flour at once, reduce the heat to medium, and stir with a wooden spoon for 2 minutes, or until the mixture forms a ball and the excess moisture has evaporated. (If the ball forms more quickly, continue to cook and stir for a full 2 minutes.)
  • Transfer the mixture to the bowl of a mixer fitted with the paddle and beat for about 30 seconds at medium speed to cool slightly. Add 4 eggs and continue to mix until completely combined and the batter has a smooth, silky texture. Stop the machine and lift up the beater to check the consistency of the batter. The batter in the mixing bowl should form a peak with a tip that falls over. If it is too stiff, beat in the white of the remaining egg. Check again and, if necessary, add the yolk. Finally, mix in 3/4 cup of the Gruyère and adjust the seasoning with salt and white pepper.
  • Fill a pastry bag fitted with a 3/8-inch plain pastry tip with the gougère batter. Pipe the batter into one-tablespoon mounds on the baking sheets, leaving about 2 inches between the gougères as the mixture will spread during the baking. Sprinkle the top of each gougère with about 1/2 teaspoon of the remaining grated cheese.
  • Bake for 7 to 8 minutes or until they puff and hold their shape. Reduce the heat to 350 degrees F and bake for an additional 20 to 25 minutes. When the gougères are done, they should be a light golden brown color. When you break one open, it should be hollow; the inside should be cooked but still slightly moist. Remove the pans from the oven and serve the gougères while hot.

Alton Brown's City Ham

If you are going, what is City Ham? Is it made from urban pigs? Here is what chef/scientist/nerd Alton Brown has to say about city style ham: A city ham is basically any brined ham that's packed in a plastic bag, held in a refrigerated case and marked "ready to cook", "partially cooked" or "ready to serve". Better city hams are also labeled "ham in natural juices".

Simply put: those big wrapped up hefty chunk of ham you see in grocery stores that's not labeled "lunch meat." I will suggest though, get a piece with a bone in it! They yield a much tastier result.

This recipe does require hours of work, waiting for the ham to slowly roast in the oven. It's perfect for big get-togethers, like Thanksgiving, where you are hosting a large number of people, and will be stuck in the kitchen making food all day anyway. After all, City Ham is a very low maintenance dish. Prep work doesn't take very long, and it makes a very beautiful and delicious entree.


Ingredients:
1 city style (brined) ham
1/4 cup brown mustard
2 cups dark brown sugar
1-ounce bourbon (poured into a spritz bottle)
2 cups crushed ginger snap cookies

Directions:
  • Heat oven to 250 degrees F.
  • Remove ham from bag, rinse and drain thoroughly.
  • Place ham, cut side down, in a roasting pan. Using a small paring knife or clean utility knife set to the smallest blade setting, score the ham from bottom to top, spiraling clockwise as you cut. (If you're using a paring knife, be careful to only cut through the skin and first few layers of fat). Rotate the ham after each cut so that the scores are no more than 2-inches across. Once you've made it all the way around, move the knife to the other hand and repeat, spiraling counter clockwise. The aim is to create a diamond pattern all over the ham. (Don't worry too much about precision here.)
  • Tent the ham with heavy duty foil, insert a thermometer, and cook for 3 to 4 hours or until the internal temperature at the deepest part of the meat registers 130 degrees F.
  • Remove and use tongs to pull away the diamonds of skin and any sheets of fat that come off with them.
    Heat oven to 350 degrees F.
  • Dab dry with paper towels, then brush on a liberal coat of mustard, using either a basting brush or a clean paint brush (clean as in never-touched paint). Sprinkle on brown sugar, packing loosely as you go until the ham is coated. Spritz this layer lightly with bourbon, then loosely pack on as much of the crushed cookies as you can.
  • Insert the thermometer (don't use the old hole) and return to the oven (uncovered). Cook until interior temperature reaches 140 degrees F, approximately 1 hour.
  • Let the roast rest for 1/2 hour before carving.

Momofuku's Crack Pie

Crack is addicting. That's what we learned from watching Dave Chappelle before he became a underground ghost comedian weaving in and out of small comedy clubs in various cities. So when Vincent challenged me to make a dessert that has "crack" in its name, well, my mouth watered. The only thing that kept me from making it as soon as I looked at the recipe was the fact that the recipe had three parts, and total time adds up to over 10 hours. Oh no.

But once I actually read the recipe again and got the ingredients ready, the process isn't gruesome at all. It's like any dessert, really. Mix the flour, eggs, cream, then bake until the sweet aroma from the oven fills up the kitchen.

Okay, maybe it's a little more complicated than baking a tray of chocolate cookies and more importantly, you do need the patience to wait for it to chill in the fridge for hours. But trust me, the wait is worthwhile! And once the pies are ready, unlike other freshly made desserts that need to consumed within a day or so, crack pies are good for over a week. Whenever you crave something sweet and buttery and gooey, just take out a slice from the fridge and enjoy.

I used this recipe from
LA Times, but most recipes you find online don't vary too much.

You can dust the sugar powder in whatever shapes you like. Just make a cutout from a piece of paper and dust the powder on top then remove the paper. Here I did a bunny shape to celebrate Lunar New Year (it's the year of the Hare).


Cookie for crust

Ingredients:

2/3 cup plus 1 tablespoon (3 ounces) flour
1/8 teaspoon baking powder
1/8 teaspoon baking soda
1/4 teaspoon salt
1/2 cup (1 stick) softened butter
1/3 cup (2 1/2 ounces) light brown sugar
3 tablespoons (1 1/4 ounces) sugar
1 egg
1 cup (3 1/2 ounces) rolled oats


Directions:

  • Heat the oven to 375 degrees.
  • In a medium bowl, sift together the flour, baking powder, baking soda and salt.
  • In the bowl of a stand mixer using the paddle attachment, or in a large bowl using an electric mixer, beat the butter, brown sugar and sugar until light and fluffy.
  • Whisk the egg into the butter mixture until fully incorporated.
  • With the mixer running, beat in the flour mixture, a little at a time, until fully combined. Stir in the oats until incorporated.
  • Spread the mixture onto a 9-inch-by-13-inch baking sheet and bake until golden brown and set, about 20 minutes. Remove from heat and cool to the touch on a rack. Crumble the cooled cookie to use in the crust.

Crust

Ingredients:

Crumbled cookie for crust
1/4 cup (1/2 stick) butter
1 1/2 tablespoons (3/4 ounce) brown sugar
1/8 teaspoon salt

Directions:

  • Combine the crumbled cookie, butter, brown sugar and salt in a food processor and pulse until evenly combined and blended (a little of the mixture clumped between your fingers should hold together).
  • Divide the crust between 2 (10-inch) pie tins (smaller pie tins are okay too; you will just end up with a thicker pie).
  • Press the crust into each shell to form a thin, even layer along the bottom and sides of the tins.
  • Set the prepared crusts aside while you prepare the filling.

Filling

Ingredients:

1 1/2 cups (10 1/2 ounces) sugar
3/4 cup plus a scant 3 tablespoons (7 ounces) light brown sugar
1/4 teaspoon salt
1/3 cup plus 1 teaspoon (3/4 ounce) milk powder
1 cup (2 sticks) butter, melted
3/4 cup plus a scant 2 tablespoons heavy cream
1 teaspoon vanilla extract
8 egg yolks
2 prepared crusts
Powdered sugar, garnish


Directions:
  • Heat the oven to 350 degrees.
  • In a large bowl, whisk together the sugar, brown sugar, salt and milk powder. Whisk in the melted butter, then whisk in the heavy cream and vanilla.
  • Gently whisk in the egg yolks, being careful not to add too much air.
  • Divide the filling evenly between the 2 prepared pie shells.
  • Bake the pies for 15 minutes, then reduce the heat to 325 degrees and bake until the filling is slightly jiggly and golden brown (similar to a pecan pie), about 10 minutes. Remove the pies and cool on a rack.
  • Refrigerate the cooled pies until well chilled. The pies are meant to be served cold, and the filling will be gooey. Dust with powdered sugar before serving. Pies are good for up to a week in the fridge.

Monday, January 31, 2011

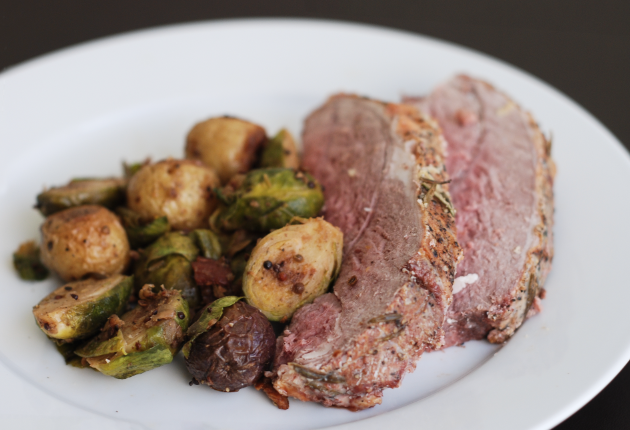
Fatty 'Cue Brussels Sprouts

Last Saturday, Porgy told me that one of his friends made a snide comment because we served Chinese take-out food, cheese and crackers, and frozen Trader Joe’s snacks when we had them over before. It totally annoyed me that someone would say that so I decided to make Roast Leg of Lamb with Roasted Potatoes and Fatty ‘Cue Brussels Sprouts (which I had planned to make on Sunday) that Saturday evening and opened up a nice bottle of Italian Rosso to de-anger myself.

I seasoned the (boneless) leg of lamb with olive oil, salt, pepper and several rosemary sprigs and roasted it in a 400F oven for 20 minutes per pound with the fat side up and used similar seasoning for potatoes (and roasted them for ~30-40 minutes until golden brown and crisped). I saw the Fatty ‘Cue Brussels Sprouts recipe a few months ago on NYTimes website and had been wanting to try it out but had totally forgotten about it until Mo-Fo brought it to my attention again last week because one of her coworkers made it and raved how good it is.


Note: I did not have shallots and fresh Thai bird-eye chili so I used 1/2 of red onions and frozen Thai green chili instead. In the future, I think I might add more chili or chili paste (like Sambal Oelek) at the end to give it more zip.

Ingredients:
2 Thai bird chilies, stems removed
2 garlic cloves
2 small shallots
4 ounces double-smoked bacon, cut crosswise into thin strips
1 tablespoon coriander seeds, crushed
1 pound brussels sprouts, trimmed and halved
Kosher salt
1/4 cup chicken broth
1 tablespoon maple syrup

Directions:
  • Combine one of the chilies with the garlic and shallots in a food processor and purée, or use a mortar and pestle.
  • Fry bacon in a large sauté pan over medium heat until most of the fat is rendered, about 5 minutes. Add coriander seeds and stir until fragrant. Transfer bacon to paper towels using a slotted spoon.
  • Add brussels sprouts to the pan, cut sides down, and cook over medium heat until golden brown on the undersides, about 5 minutes. Season with salt and transfer to paper towels.
  • Add garlic-shallot paste and cook over low heat until fragrant, about one minute. Return brussels sprouts to pan and cook, stirring, 1 to 2 minutes. Add chicken broth and bring to a simmer.
  • Cover, reduce heat to low, and simmer until sprouts are mostly tender, about 5 minutes. Uncover and reduce broth to the consistency of a glaze.
  • Thinly slice the remaining chili. Remove pan from heat and stir in the syrup, bacon and sliced chilies. Sprinkle with salt.

Sunday, January 30, 2011

Nobu style Miso-glazed Black Cod

My friend Vincent and I used to work together. Often when we were sitting in our cubicles looking at spreadsheets of numbers and graphs, we have another window open with pictures of beautiful food on them. We would trade recipes, tips on the newest and hottest restaurants, and our current cravings. Anyway, this year Vincent invited me to guest blog and I am going to start it with one of my favorite dishes.

In fact, if I had a last meal, it'll certainly include this as an entree: Miso-glazed black cod. Everytime I order this in a restaurant, I close my eyes and go "mmmmm" (at least in mind I do). The succulent buttery tender fish is indescribably good. Once you've had cod, all the other fishes taste like overcooked dry pieces of chicken.

Unfortunately, it took me a while to realize how easy it is to make it yourself! It's far cheaper, way easier, and no one will care if you want to lick the plate clean afterwards.

Here is the recipe I used from TheKitchn. All the Nobu inspired miso-glazed black cod recipes online are pretty much the same.


Ingredients for two:
1 black cod fillet (half a pound)

2 tablespoons sake
2 tablespoons mirin
2 tablespoons white miso paste
1.5 tablespoons sugar


Directions:

  • Two to three days beforehand, make the Nobu-style Saikyo Miso marinade and marinate the fish.
  • Bring the sake and the mirin to a boil in a medium saucepan over high heat. Boil for 20 seconds to evaporate the alcohol. Turn the heat down to low and add the miso paste, mixing with a wooden spoon. When the miso has dissolved completely, turn the heat up to high again and add the sugar, stirring constantly with the wooden spoon to ensure that the bottom of the pan doesn’t burn. Remove from heat once the sugar is fully dissolved. Cool to room temperature.

  • Pat the black cod fillets thoroughly dry with paper towels. Slather the fish with the miso marinade and place in a non-reactive dish or bowl and cover tightly with plastic wrap. Leave to steep in refrigerator for 2 to 3 days. If you don't have enough time, marinating it for 24 hours is okay too, but 3 days yields a much tastier result.

To cook the fish:

  • Preheat oven to 400°F (200°C, gas 6). Preheat a grill or broiler. Use "high" for broiler. Lightly wipe off any excess miso clinging to the fillets but don't rinse it off.
  • Place the fish on the grill, or in a broiler pan, and grill or broil until the surface of the fish turns brown and the marinate starts to bubble. Then bake for 10 minutes.
To serve with rice and bok choy:
  • Serve with Japanese rice. For bok choy, you can put them in the oven along with the cod. Drizzle them with olive oil and a little salt. Roast for about 5-7 minutes.