Monday, January 31, 2011

Fatty 'Cue Brussels Sprouts

Last Saturday, Porgy told me that one of his friends made a snide comment because we served Chinese take-out food, cheese and crackers, and frozen Trader Joe’s snacks when we had them over before. It totally annoyed me that someone would say that so I decided to make Roast Leg of Lamb with Roasted Potatoes and Fatty ‘Cue Brussels Sprouts (which I had planned to make on Sunday) that Saturday evening and opened up a nice bottle of Italian Rosso to de-anger myself.

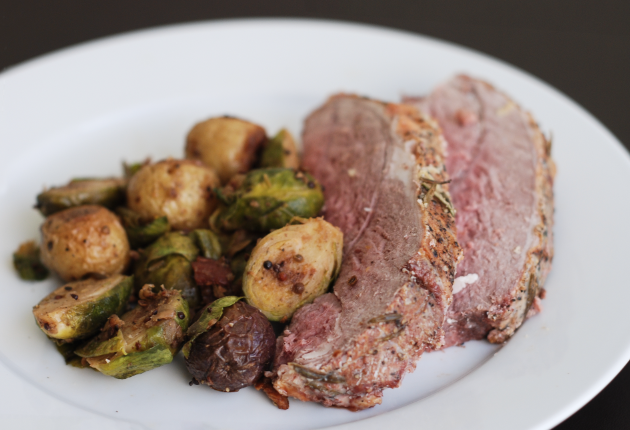
I seasoned the (boneless) leg of lamb with olive oil, salt, pepper and several rosemary sprigs and roasted it in a 400F oven for 20 minutes per pound with the fat side up and used similar seasoning for potatoes (and roasted them for ~30-40 minutes until golden brown and crisped). I saw the Fatty ‘Cue Brussels Sprouts recipe a few months ago on NYTimes website and had been wanting to try it out but had totally forgotten about it until Mo-Fo brought it to my attention again last week because one of her coworkers made it and raved how good it is.


Note: I did not have shallots and fresh Thai bird-eye chili so I used 1/2 of red onions and frozen Thai green chili instead. In the future, I think I might add more chili or chili paste (like Sambal Oelek) at the end to give it more zip.

Ingredients:
2 Thai bird chilies, stems removed
2 garlic cloves
2 small shallots
4 ounces double-smoked bacon, cut crosswise into thin strips
1 tablespoon coriander seeds, crushed
1 pound brussels sprouts, trimmed and halved
Kosher salt
1/4 cup chicken broth
1 tablespoon maple syrup

Directions:
  • Combine one of the chilies with the garlic and shallots in a food processor and purée, or use a mortar and pestle.
  • Fry bacon in a large sauté pan over medium heat until most of the fat is rendered, about 5 minutes. Add coriander seeds and stir until fragrant. Transfer bacon to paper towels using a slotted spoon.
  • Add brussels sprouts to the pan, cut sides down, and cook over medium heat until golden brown on the undersides, about 5 minutes. Season with salt and transfer to paper towels.
  • Add garlic-shallot paste and cook over low heat until fragrant, about one minute. Return brussels sprouts to pan and cook, stirring, 1 to 2 minutes. Add chicken broth and bring to a simmer.
  • Cover, reduce heat to low, and simmer until sprouts are mostly tender, about 5 minutes. Uncover and reduce broth to the consistency of a glaze.
  • Thinly slice the remaining chili. Remove pan from heat and stir in the syrup, bacon and sliced chilies. Sprinkle with salt.

Sunday, January 30, 2011

Nobu style Miso-glazed Black Cod

My friend Vincent and I used to work together. Often when we were sitting in our cubicles looking at spreadsheets of numbers and graphs, we have another window open with pictures of beautiful food on them. We would trade recipes, tips on the newest and hottest restaurants, and our current cravings. Anyway, this year Vincent invited me to guest blog and I am going to start it with one of my favorite dishes.

In fact, if I had a last meal, it'll certainly include this as an entree: Miso-glazed black cod. Everytime I order this in a restaurant, I close my eyes and go "mmmmm" (at least in mind I do). The succulent buttery tender fish is indescribably good. Once you've had cod, all the other fishes taste like overcooked dry pieces of chicken.

Unfortunately, it took me a while to realize how easy it is to make it yourself! It's far cheaper, way easier, and no one will care if you want to lick the plate clean afterwards.

Here is the recipe I used from TheKitchn. All the Nobu inspired miso-glazed black cod recipes online are pretty much the same.


Ingredients for two:
1 black cod fillet (half a pound)

2 tablespoons sake
2 tablespoons mirin
2 tablespoons white miso paste
1.5 tablespoons sugar


Directions:

  • Two to three days beforehand, make the Nobu-style Saikyo Miso marinade and marinate the fish.
  • Bring the sake and the mirin to a boil in a medium saucepan over high heat. Boil for 20 seconds to evaporate the alcohol. Turn the heat down to low and add the miso paste, mixing with a wooden spoon. When the miso has dissolved completely, turn the heat up to high again and add the sugar, stirring constantly with the wooden spoon to ensure that the bottom of the pan doesn’t burn. Remove from heat once the sugar is fully dissolved. Cool to room temperature.

  • Pat the black cod fillets thoroughly dry with paper towels. Slather the fish with the miso marinade and place in a non-reactive dish or bowl and cover tightly with plastic wrap. Leave to steep in refrigerator for 2 to 3 days. If you don't have enough time, marinating it for 24 hours is okay too, but 3 days yields a much tastier result.

To cook the fish:

  • Preheat oven to 400°F (200°C, gas 6). Preheat a grill or broiler. Use "high" for broiler. Lightly wipe off any excess miso clinging to the fillets but don't rinse it off.
  • Place the fish on the grill, or in a broiler pan, and grill or broil until the surface of the fish turns brown and the marinate starts to bubble. Then bake for 10 minutes.
To serve with rice and bok choy:
  • Serve with Japanese rice. For bok choy, you can put them in the oven along with the cod. Drizzle them with olive oil and a little salt. Roast for about 5-7 minutes.

Saturday, January 29, 2011

America's Test Kitchen Ultimate Banana Bread

I don’t usually eat breakfast because I am not a big fan of cereal or granola and I’d rather have an extra 15 minutes of sleep. I know that breakfast is the most important meal of the day (I can see Porgy agreeing to this while rolling his eyes…) but it’s just so cumbersome if you don’t have anything simple to heat up and eat right away.

I’ve made banana breads before and I love them since they smell and taste wonderful and they are perfect for breakfast. This America's Test Kitchen Ultimate Banana Bread recipe calls for 5 large bananas to amplify the banana flavor and reducing the liquid from the bananas so the bread won’t get too soggy. So I lifted Arthur up from my lap, put him on Porgy’s and went to Chinatown to buy some B-A-N-A-N-A-S while the song stuck in my head.


Ingredients:
1 3/4 cups unbleached all-purpose flour
1 teaspoon baking soda
1/2 teaspoon table salt
6 large very ripe bananas (about 2 1/4 pounds), peeled (see note)
8 tablespoons (1 stick) unsalted butter, melted and cooled slightly
2 large eggs
3/4 cup packed light brown sugar
1 teaspoon vanilla extract
1/2 cup walnuts, toasted and coarsely chopped (optional)
2 teaspoons granulated sugar

Directions:
  • Adjust oven rack to middle position and heat oven to 350 degrees.
  • Spray 8 1⁄2 by 4 1⁄2-inch loaf pan with nonstick cooking spray.
  • Whisk flour, baking soda, and salt together in large bowl.
  • Place 5 bananas in microwave-safe bowl; cover with plastic wrap and cut several steam vents in plastic with paring knife. Microwave on high power until bananas are soft and have released liquid, about 5 minutes. Transfer bananas to fine-mesh strainer placed over medium bowl and allow to drain, stirring occasionally, 15 minutes (you should have 1⁄2 to 3⁄4 cup liquid).
  • Transfer liquid to medium saucepan and cook over medium-high heat until reduced to 1⁄4 cup, about 5 minutes. Remove pan from heat, stir reduced liquid into bananas, and mash with potato masher until fairly smooth.
  • Whisk in butter, eggs, brown sugar, and vanilla. Pour banana mixture into flour mixture and stir until just combined with some streaks of flour remaining. Gently fold in walnuts, if using. Scrape batter into prepared pan.
  • Slice remaining banana diagonally into 1⁄4-inch-thick slices. Shingle banana slices on top of either side of loaf, leaving 1 1⁄2-inch-wide space down center to ensure even rise. Sprinkle granulated sugar evenly over loaf.
  • Bake until toothpick inserted in center of loaf comes out clean, 55 to 75 minutes.
  • Cool bread in pan on wire rack 15 minutes, then remove loaf from pan and continue to cool on wire rack.
  • Serve warm or at room temperature.
Note:
  • Be sure to use very ripe, heavily speckled (or even black) bananas in this recipe.
  • This recipe can be made using 5 thawed frozen bananas; since they release a lot of liquid naturally, they can bypass the microwaving in step 2 and go directly into the fine-mesh strainer.
  • Do not use a thawed frozen banana in step 4; it will be too soft to slice. Instead, simply sprinkle the top of the loaf with sugar.
  • The test kitchen’s preferred loaf pan measures 8 1⁄2 by 4 1⁄2 inches; if you use a 9 by 5-inch loaf pan, start checking for doneness five minutes earlier than advised in the recipe.
  • The texture is best when the loaf is eaten fresh, but it can be stored (cool completely first), covered tightly with plastic wrap, for up to 3 days.

Friday, January 28, 2011

Chicken Adobo

How do you mend a broken heart? No, it’s not what you think… Porgy and I aren’t going to Splitville – well, not that I know of anyway. However, something similarly tragic and saddening happened a couple weeks ago... we found out that Arthur has a lymphoma cancer. After seeing a vet oncologist for consultation, we decided not to do any treatments on him because it’s not fair for him (and for us) to have him suffer through all the medications that he has to take and the chemotherapy sessions that he has to endured just to prolong his life for possibly another year. He still behaves normally (very food oriented and ever so grumpy in the morning) and not showing any other lymphoma symptoms except the enlarged glands so we don’t have to do the inevitable thing anytime soon. I think he’s actually enjoying the fact that we are totally spoiling him nowadays.

Since we’re stuck at home even more (because we feel guilty if we do not spend more time with him), we decided to do some more cooking - Porgy made America's Test Kitchen’s Chicago-style deep dish pizza while I made NYTimes’ Chicken Adobo after reading the their article on how each Filipinos make Chicken Adobo a bit differently from the other person.

I have never made Chicken Adobo with coconut milk before so I thought it is kind of interesting that the recipe calls for it and the marinade mixture smells fantastic. Although I love the taste, I thought the vinegar is a bit too overwhelming in both the chicken and the sauce so if I have to make some adjustment to the recipe, I would cut back on the vinegar and maybe added some palm sugar to help the chicken to caramelize even more.


Ingredients:
1 cup coconut milk
¼ cup soy sauce
1½ cup rice vinegar
12 garlic cloves, peeled
3 whole bird’s-eye chilies or other fiery chili
3 bay leaves
1½ teaspoons freshly ground black pepper
3 to 4 pounds chicken thighs

Directions:
  • Combine all of the marinade ingredients in a large, nonreactive bowl or resealable plastic freezer bag. Add the chicken and turn to coat. Refrigerate overnight or for at least 2 hours.
  • Place chicken and marinade in a large lidded pot or Dutch oven over high heat and bring to a boil. Immediately reduce heat to a simmer and cook, stirring occasionally, until the chicken is cooked through and tender, around 30 minutes.
  • Heat broiler. Transfer chicken pieces to a large bowl, raise heat under the pot to medium-high, and reduce the sauce until it achieves almost the consistency of cream, about 10 minutes. Remove bay leaves and chilies.
  • Place chicken pieces on a roasting pan and place under broiler for 5 to 7 minutes, until they begin to caramelize. Remove, turn chicken, baste with sauce and repeat, 3 to 5 minutes more. Return chicken to sauce and cook for a few minutes more, then place on a platter and drizzle heavily with sauce.

Sunday, January 9, 2011

Thai-style Chicken with Basil, Celery and Red Cabbage

As I mentioned in my last post, I changed up my meal this week from Italian-style Pesto alla Trapanese to Thai-style Chicken with Basil, Celery and Red Cabbage. I got the idea for this dish from America's Test Kitchen and added some sliced celery and red cabbage because I had them in my fridge and I wanted to add more vegetables & fiber to the dish.

I really love the flavor of this dish (thanks to the combination of fish sauce, chili and basil) and the crunchiness of the cabbage. I guess I will have something to look forward to during lunch time tomorrow!


Ingredients:

2 cups fresh basil leaves , tightly packed
6 medium garlic cloves , peeled
1 jalapeno pepper, seeded
3 green Thai chiles, stemmed & seeded
4 tablespoons fish sauce
2 tablespoon oyster sauce
2 teaspoon rice vinegar
2 tablespoon sugar
1 pound boneless, skinless chicken breast, cut into 2-inch pieces
6 medium shallots, peeled and thinly sliced (about 3/4 cup)
2 tablespoons vegetable oil
1/4 teaspoon red pepper flakes
4 celery stalks, sliced
1 head red cabbage, cored and sliced

Directions:
  • Process 1 cup basil leaves, garlic, and chiles in food processor until finely chopped, 6 to 10 one-second pulses, scraping down bowl with rubber spatula once during processing. Transfer 1 tablespoon basil mixture to small bowl and stir in 2 tablespoon fish sauce, oyster sauce, vinegar, and sugar; set aside. Transfer remaining basil mixture to 12-inch heavy-bottomed nonstick skillet. Do not wash food processor bowl.
  • Pulse chicken and 1 tablespoon fish sauce in food processor until meat is chopped into - approximate 1/4-inch pieces, six to eight 1-second pulses. Transfer to a medium bowl and refrigerate 15 minutes.
  • Stir shallots and oil into basil mixture in skillet. Heat over medium-low heat (mixture should start to sizzle after about 1 1/2 minutes; if it doesn’t, adjust heat accordingly), stirring constantly, until garlic and shallots are golden brown, 5 to 8 minutes. Add in the sliced celery and cook for 5 more minutes.
  • Add chicken, increase heat to medium, and cook, stirring and breaking up chicken with the spatula, until only traces of pink remain, 4-6 minutes. Add reserved basil-fish sauce mixture and continue to cook, stirring constantly until chicken is no longer pink, about 2 more minutes.
  • Add in the sliced red cabbage and red pepper flakes, stir to combine, cover the pan, and cook for 5 more minutes. Stir in remaining cup basil leaves and cook, stirring constantly, until basil is wilted, 30 to 60 seconds.
  • If there are too much broth, thickened with 2 tablespoon corn starch dissolved in a small bowl with 1/4 cup of the broth.
  • Serve immediately over white rice.

Sausage Parmesan Corn Muffin

Last week I had sweet blueberry muffins for my breakfast and afternoon snacks and Italian pasta for my lunches for the week. To change it up, I decided to do something savory and Asian ... Sausage Parmesan Corn Muffin for my breakfast and afternoon snacks and a Thai-style Chicken with Basil, Celery and Red Cabbage for my lunch.

Since I was too lazy to go to the grocery, I used what I've already had in my fridge & pantry and I followed the super simple sweet corn muffin recipe on the Albers yellow corn meal box and just added the cooked Italian sausage, jalapeno and grated Parmesan cheese when mixing the dry and wet ingredients together. I baked the muffins a couple minutes longer than what the box recommended to compensate for the extra ingredients. Although the color of the muffin is not a bright yellow as some other corn muffins that I've seen before, I really love the taste and the texture of these savory muffins... I can't wait to have them again tomorrow.


Ingredients:
16oz Italian sausage, remove from casing
1 jalapeno pepper, seeded and finely chopped
1 cup grated Parmesan cheese
1 1/2 cups all-purpose flour
2/3 cup granulated sugar
1/2 cup Albers yellow corn meal
1 tablespoon baking powder
1/2 teaspoon salt
1 1/4 cups milk
2 large eggs, lightly beaten
1/3 cup vegetable oil
3 tablespoon butter, melted

Note: I used Parmesan cheese because I don't have any other cheese. You can use other types of cheese like Cheddar or Jack cheese to make the color pops and the muffins a bit more cheesy gooey.

Directions:
  • Cook the sausage and minced jalapeno in a pan over a medium heat with 2 tablespoons of oil for 5-8 minutes. Drain the oil off the sausage mixture and set aside to cool.
  • Preheat oven to 350F and grease or paper-line the muffin cups.
  • Combine flour, sugar, corn meal, baking powder, 2/3 cup of the Parmesan cheese and salt in a large bowl.
  • Combine the milk, eggs, oil and slightly cooled melted butter in a small bowl, mix well.
  • Add the milk-&-egg mixture to the flour mixture; stir a couple of times and then add the sausage and the jalapeno and mix some more until just blended.
  • Pour into prepared muffin cups filling about 2/3 cup full and top with the rest of grated Parmesan cheese.
  • Bake for 20-22 minutes until golden brown and when a wooden pick inserted in the center comes out clean.
  • Cool in pans or wire racks for 5 minutes, serve warm.

Wednesday, January 5, 2011

Ham & Pea Barley Soup

Brrrr... it's been pretty cold in San Francisco in the past few days, I felt that we needed something warm, soupy and more substantial for dinner besides salad. To keep it somewhat healthy, I made this ham & pea barley soup utilizing the ingredients that I had in my freezer and pantry using Whole Foods' Root Vegetable Stew with Beef and Barley recipe as a guideline.


Ingredients:
1 cup of medium diced ham
2 carrots, small diced
1 onion, finely chopped
1 cup sliced crimini mushroom
1 cup pearled barley
1 bay leaf
2 cups of chicken stock
1/4 cup of flour
2 green onions, finely chopped (or 1/4 cup of parsley)
salt & pepper

Directions:
  • In a large Dutch oven or soup pot, heat 1 tablespoons olive oil over medium heat and cook the ham cubes for about 5 minutes or so until a bit browned, set aside.
  • Add remaining 2 tablespoon of olive oil to the pan and stir in the chopped onion and carrots, scrapping the brown ham bits from the bottom of the pot. Cook the vegetables for 3 minutes, stirring occasionally.
  • Add the barley and continue to cook, stirring for an additional minute.
  • Add in the bay leaf, chicken broth and ham back into the pot, bring to a boil and then reduce heat to a simmer. Continue cooking, uncovered, stirring occasionally for 30 minutes.
  • In a small bowl, mix the flour and 1/2 cup of the cooking broth. Add the flour mixture and the sliced mushroom into the pot and cook for another 30 minutes until barley is cooked and stew is thickened.
  • Adjust seasoning with salt & pepper and add in the frozen pea and cooked for another 5 minutes.
  • Garnish with parsley or green onion.

Sunday, January 2, 2011

Best Blueberry Muffins?

In order to pep myself up for first day at the office in 2011, I decided to bake some muffins to snack at the office. I saw this Best Blueberry Muffins recipe on America’s Test Kitchen website and found it interesting the way the ATK folks spiked up the blueberry flavor in the muffin by adding concentrated blueberry jam, instead of adding more blueberries, to keep the blueberries from sinking to the bottom of the muffin.

Since I was feeling lazy, I used a store-bought blueberry jam instead of making my own – and boy oh boy, it was a bad decision. The jam that I bought was not concentrated enough so I had to increase the baking time by 2-3 more minutes per batch and it seemed to make the muffin texture to be more dense. So... unfortunately I can’t tell you whether these are the Best Blueberry Muffins or not – for now that is; I know for sure that I will make them again including the blueberry jam from scratch!


PS: I wonder if I can use this concentrate blueberry jam idea to spike up the blueberry flavor in Ina’s Blueberry Crumb Cake? What do you think?

Ingredients:
  • 1 cup fresh blueberries, picked over
  • 1 1/8 cups sugar
  • 2 1/2 cups unbleached all-purpose flour
  • 2 1/2 teaspoons baking powder
  • 1 teaspoon table salt
  • 2 large eggs
  • 4 tablespoons (1/2 stick) unsalted butter , melted and cooled slightly
  • 1/4 cup vegetable oil
  • 1 cup buttermilk
  • 1 1/2 teaspoons vanilla extract
For Blueberry jam:
  • 1 cup fresh blueberries, picked over
  • 1 teaspoon sugar
For Lemon-Sugar topping:
  • 1/3 cup sugar
  • 1 1/2 teaspoons finely grated zest from 1 lemon
Directions:
  • Adjust oven rack to upper-middle position and heat oven to 425 degrees. Spray standard muffin tin with nonstick cooking spray.
  • Bring 1 cup blueberries and 1 teaspoon sugar to simmer in small saucepan over medium heat. Cook, mashing berries with spoon several times and stirring frequently, until berries have broken down and mixture is thickened and reduced to 1/4 cup, about 6 minutes. Transfer to small bowl and cool to room temperature, 10 to 15 minutes.
  • Whisk flour, baking powder, and salt together in large bowl. Whisk remaining 1 1/8 cups sugar and eggs together in medium bowl until thick and homogeneous, about 45 seconds. Slowly whisk in butter and oil until combined. Whisk in buttermilk and vanilla until combined. Using rubber spatula, fold egg mixture and remaining cup blueberries into flour mixture until just moistened. (Batter will be very lumpy with few spots of dry flour; do not overmix.)
  • Divide batter equally among prepared muffin cups (batter should completely fill cups and mound slightly). Spoon teaspoon of cooked berry mixture into center of each mound of batter. Using chopstick or skewer, gently swirl berry filling into batter using figure-eight motion.
  • Stir together sugar and lemon zest in small bowl until combined; set aside. Sprinkle lemon sugar evenly over muffins.
  • Bake until muffin tops are golden and just firm, 17 to 19 minutes, rotating muffin tin from front to back halfway through baking time. Cool muffins in muffin tin for 5 minutes, then transfer to wire rack and cool 5 minutes before serving.

Pesto alla Trapanese

Tada... a relevation! Today I learned that I don't need meat sauce with my pasta to have a hearty delicious meal. I saw this Pasta with Tomato and Almond Pesto (Pesto alla Trapanese) recipe on America's Test Kitchen's Saucy Italian Favorites episode. I thought it was very clever of the Sicilians to use fresh tomatoes and almonds instead of pine nuts as the main ingredients for their pesto. I like the fact that you can make this dish in less than 20 minutes and still end up with a fantastic satisfying meal. The only thing that I would change if you decide to make this, is to double up the portion because you might find yourself in a similar situation where you can't stop eating because it's so delicious!


Ingredients:
  • 1/4 cup slivered almonds
  • 12 ounces cherry or grape tomatoes (about 2 1/2 cups)
  • 1/2 cup packed fresh basil leaves
  • 1 medium garlic clove, minced or pressed through garlic press (about 1 teaspoon)
  • 1 small pepperoncini (hot peppers in vinegar), stemmed, seeded, and minced (about 1/2 teaspoon) - I substituted this with 1/4 teaspoon red pepper flakes soaked with 1/2 teaspoon of red wine vinegar
  • salt
  • 1/3 cup extra-virgin olive oil
  • 1 pound pasta, preferably linguine or spaghetti
  • 1 ounce Parmesan cheese, grated (about 1/2 cup), plus extra for serving
Directions:
  • Toast almonds in small skillet over medium heat, stirring frequently, until pale golden and fragrant, 2 to 4 minutes. Cool almonds to room temperature.
  • Process cooled almonds, tomatoes, basil, garlic, pepperoncini (or red pepper flakes with vinegar), and 1 teaspoon salt in food processor until smooth, about 1 minute. Scrape down sides of bowl with rubber spatula. With machine running, slowly drizzle in oil, about 30 seconds.
  • Meanwhile, bring 4 quarts water to boil in large pot. Add pasta and 1 tablespoon salt and cook until al dente. Reserve 1/2 cup cooking water; drain pasta and transfer back to cooking pot.
  • Add pesto and 1/2 cup Parmesan to cooked pasta, adjusting consistency with reserved pasta cooking water so that pesto coats pasta. Serve immediately, passing Parmesan separately.